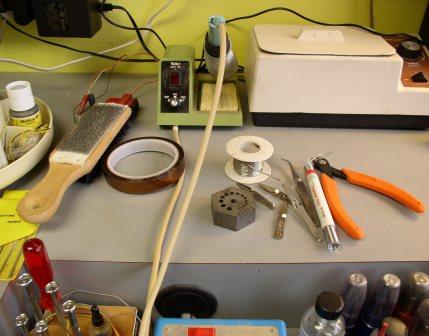
Basic tools for soldering: a soldering iron, solder, wire cutters, wire strippers, tweezers, heat sinks, etc. This photo does not show an example of desoldering braid which is useful for touch ups and removing mistakes.
If you are building a model railroad, you will need to learn to solder. This skill is used for attaching track feeds to the rails to provide power to the layout, for installing decoders in locomotives, for building locomotives and signals and much more.
Manufacturers minimize the need to solder where ever possible by using screw connectors, board repalcement decoders and plugs for installing decoders. But, there is really no way to completely escape the need to solder if you are building a railroad. It's really not as difficult as it may seem. With a little practice, you'll be an expret in no time!
Soldering means using a soldering iron to heat up solder to create electrical connections. The iron heats the electrical conductors and the solder, creating electrical connections which are solid and conductive. Once the parts cool, the connection will be solid and reliable.
Remember these basic principles of soldering and it will make your job a lot easier:
Solder flows toward the heat
Make sure that the pieces you are soldering together are both hot. If one is hot and the other is not hot, you will get a cold solder joint, which will not be reliable. Electricity might flow for a while, but eventually the joint will come apart and you will have problems.
Keep the heat contained
Getting both pieces hot can cause problems, especially if you are soldering around plastic pieces such as crossties on track. You can use heat sinks around the work area to absorb excess heat. There are special metal clips used for heat sinks. But you can also use small pieces of cloth or paper towel that have been dampened with water. These will both keep the heat from flowing to other parts in the area where you are working while you try to get the pieces you want to solder together hot enough at the joint for solder to flow properly. A correct solder joint will be slightly shiny while a cold solder joint will be very dull looking.
Use the right type of solder
You should use solder that is made for electronics applications; this solder has a rosin core. Solder used for plumbing applications contains acid as its core and is highly undesirable for electronics. Likewise, you can use rosin flux paste to help clean the electrical connections, but the flux used for plumbing applications also contains undesirable acid.
Tin the wires
In some instances, you should first tin the wire that is to be connected to a device or to the track to make the wire easy to solder. Digitrax recommends 14 Gauge stranded wire (AWI standards) for most applications. Small sized wire that has a solid center is prone to breaking, often inside the insulating jacket, giving no indication as to where the break is. In certain situations, 16 Gauge stranded wire can be used if the run of wire is short.
Regardless of wire size, the strands of wire should be tinned prior to making the final solder connection. Strip off a short piece of the wire's insulating jacket using a wire stripper, twist the exposed wire strands together, then heat the exposed wire and touch the solder to the heated wire. The solder flows into the strands, making a small segment of "solid" wire that can be bent into the proper shape for the final soldered connection.
Use the right soldering iron
The choice of soldering iron is a matter of individual preference. A temperature controlled soldering iron is best. You can get one with a digital read out and a place for your cleaning sponge. We use these in the factory for assembly. In many cases, a soldering "pencil" will work. A soldering "gun" will not work because its tip is not fine enough to make small connections.
Be Careful
Remember that you are working with a device that produces heat, so your workspace should be clear of anything flammable. Also, take care to keep the soldering tip away from your fingers and your skin.